

Showing posts with label Createables. Show all posts
Showing posts with label Createables. Show all posts
Saturday, March 10, 2012
More Marianne & Sugar Nellie

Friday, March 9, 2012
More from Marianne
This is a very simple card using the die LRO202 on a gate fold fold card.
 To use the die in this way you have to have the 'gates' overlapping so that they will meet in the middle when they are cut. You will also have to make the card base taller than you want it so that you can move the dies into position and then you will have to cut some off the top and the bottom. After making the card base I just added some colored paper to the inside with a frame made with the two largest Spellbinders labels 4 dies. The image is a digi from Sugar Nellie colored with Prismacolor pencil and Turpenoid and then cut out.

Wednesday, March 7, 2012
Marianne Designs
I have finally gotten back after too long a break! Between my class and my daughter visiting I haven't had much time for making cards or blogging. A little late but these are the sample cards I made for the latest release from Dutch Paper Crafts. Marianne Designs LRO200-202
 For this card I used the corner die, LRO200 I cut it 4 times and attached it with dimensional tape. To use this die in more than one corner you will need two or more of them as when you run it through the cutting machine, unless you can figure out when to stop on the second one you will flatten the embossing on the first one or you can put the card back in the die and hand emboss it.
 I again used the corner die but just on one corner.
 For this card I used the corner die again but cut the first one and cut it like an envelope flap and then added two more. For the border on the bottom of the card I used the die LRO201 as a stencil after cutting and embossing it.
 This time I used the corner die again but on the fold of the card being sure to line up the cutting edge on the fold. I then used the 3rd die in the series LRO202 on the bottom of the card.
 For this card I cut and embossed the die and backed it with solid color cardstock. I then used the die as a template to trace the shape of the edge of the die and cut the DP. This was attached to the base with tape around the two sides and bottom creating a pocket for the tag. The border punch as cut and attached at the bottom.


Thursday, January 19, 2012
Medallion and Digi
Along the same lines as yesterday I made another card using parts of a medallion and a digi stamp.

The medallion I used here is an older from Marianne Designs LRO 129. The butterflies are from a Martha Stewart punch.The diasy corner digi is from Dianne. That is all the info I have. If digi designers would put their url as part of the digi name it would make it a lot easier to give credit where credit is due!

The medallion I used here is an older from Marianne Designs LRO 129. The butterflies are from a Martha Stewart punch.The diasy corner digi is from Dianne. That is all the info I have. If digi designers would put their url as part of the digi name it would make it a lot easier to give credit where credit is due!
Wednesday, January 18, 2012
Challenge
The challenge this week at my Card Camp Yahoo Group is to make a card using pink and gray and also have something on it beginning with the letter D. This is the card I made for the challenge.
 The D is for Dahlia. I colored the digi image using Prismacolor pencils. For the gray I used paper from my stash. The medallion is from Marinanne Designs LRO 185. I cut the card base smaller so that it would still fit in a standard sized envelope.

Tuesday, January 17, 2012
Love Forever
I had time yesterday to make a card for me. When I started out I had no idea where I was going with it but I wanted to use these papers. Well when you start without any kind of a plan it can take forever when you take into consideration the time you spend just thinking about what you want to do and change your mind a dozen times!
 I used a variety of dies. Spellbinders Labels 4, Spellbinders Lattice Pendants, Memory Box Amira Flourish and Cuttlebug hearts.
 On the inside I also used Marianne Designs Createabilities LRO 150. Now I am going to make a less time consuming card!


Sunday, December 11, 2011
I'm back...kinda
My desktop is still not fixed but I did download my photo editing program to my laptop so I am sort of in business again.
These are some cards I made for Dutch Paper Crafts using Marianne Designs ornament dies.

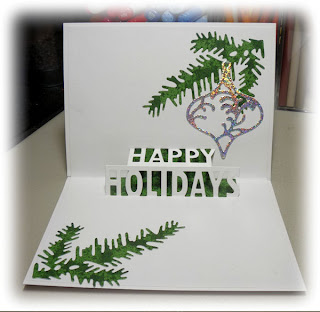
I also used a pop-up die to make this card.


For this easel card I used a small calendar to hold the card open.


For this book card the ornaments are cut from holographic paper and backed with pearl paper. The ornaments in the box are suspended on clear thread. I fixed the thread to the back of the ornaments with Scor-tape and poked small holes in the top and bottom of the box and threaded the thread through and fixed it with Scor- tape. As you move the card the ornaments jiggle and catch the light.
 For the bell ornament I decided to make a wedding card instead of a Christmas card
These are some cards I made for Dutch Paper Crafts using Marianne Designs ornament dies.


I also used a pop-up die to make this card.


For this easel card I used a small calendar to hold the card open.


For this book card the ornaments are cut from holographic paper and backed with pearl paper. The ornaments in the box are suspended on clear thread. I fixed the thread to the back of the ornaments with Scor-tape and poked small holes in the top and bottom of the box and threaded the thread through and fixed it with Scor- tape. As you move the card the ornaments jiggle and catch the light.

Friday, November 11, 2011
Dahlia
I found this image already colored in the pile on the side of my table and decided that I needed to make a card with it before it got lost forever!.

I used a Spellbinder label 13, traced around the inside of the dies and then cut it out with scissors. I then used the same die and the Cuttlebug to cut a mat from red cardstock. Behind the label is a Marianne Designs Creatables LRO 116.

I used a Spellbinder label 13, traced around the inside of the dies and then cut it out with scissors. I then used the same die and the Cuttlebug to cut a mat from red cardstock. Behind the label is a Marianne Designs Creatables LRO 116.
Monday, September 12, 2011
Birthday in white
There was no plan when I started to make this card except that I wanted to use some of the flowers I bought from Wild Orchid Crafts.
 I used a Martha Stewart punch on the bottom of the card and on the flap. I fitted a corner of a Cuttlebug Swiss Dots folder into the triangle and then used a scoreboard to make lines between the dots and the edge. A Spellbinder labels 13, a stamp from Just Rite and a Marianne Designs Createables Frames and Swirls LR0116 finishes it off.

Friday, September 9, 2011
Cut it out in circles
I used the same die for this card as the cut it out card but this time I used circle apertures.

Thursday, September 1, 2011
Exploding box
I thought I would do something a little different from a card so I made this exploding box.


This box is small, 2.75" x 2.75". I don't know what I am going to do with it that is why the inside panels are blank. It was fun to do. I used flowers from Wild Orchid, Martha Stewart punches and dies from Marianne Designs.


This box is small, 2.75" x 2.75". I don't know what I am going to do with it that is why the inside panels are blank. It was fun to do. I used flowers from Wild Orchid, Martha Stewart punches and dies from Marianne Designs.
Monday, August 29, 2011
Precious Memories
I recently purchased the Spellbinders Rose Creations dies. This is the first rose I made with the dies. I only made one and didn't add any color as I was experimenting with watercolor paper to make the rose but I liked the way it turned out well enough to use it on a card.

I used kraft cardstock for the card base. The aperture was cut and embossed with Spellbinders Labels 18. For the sentiment I used a smaller die from the same set. After stamping with Versamark ink and embossing with white embossing powder cut out the sentiment then used the same die as a stencil, tracing around the outside of the die and cutting it out with scissors. The other die is from Marinanne Designs and the butterflies were punched with a Martha Stewart punch. There are tiny holeless pearls on the butterfly bodies but they are hard to see!

I used kraft cardstock for the card base. The aperture was cut and embossed with Spellbinders Labels 18. For the sentiment I used a smaller die from the same set. After stamping with Versamark ink and embossing with white embossing powder cut out the sentiment then used the same die as a stencil, tracing around the outside of the die and cutting it out with scissors. The other die is from Marinanne Designs and the butterflies were punched with a Martha Stewart punch. There are tiny holeless pearls on the butterfly bodies but they are hard to see!
Monday, August 15, 2011
Upright diamond fold card
I found the directions for making this card HERE. The problem was the directions are metric so I had to work things out for inches as I don't do metric! Now I have another problem I saved my directions that I planned to share with you to my computer but that computer is having problems so I don't have access to my files .( I am doing this post on my laptop) I will add my directions as soon as I can get to my files.
Edited to add:- You can find the PDF with the directions in inches HERE
 This is the front of the card. The stamp is from Flourishes stamped, colored and cut out with Spellbinders Labels 10.

The inside of the card I decorated using a part of a stamp from Stampin Up. The corners and hearts are from Cuttlebug and the rest of the embellishments from Marianne Designs Createables
Edited to add:- You can find the PDF with the directions in inches HERE


The inside of the card I decorated using a part of a stamp from Stampin Up. The corners and hearts are from Cuttlebug and the rest of the embellishments from Marianne Designs Createables
Thursday, July 28, 2011
Birthday Card.
These are birthday card I made for Card Camp members who had birthdays this month.

I used Spellbinders Labels 14 and 18 and one of the Spellbinders Fancy Tags 3 dies cut and embossed with the Cuttlebug and edged with a gold leaf pen. For the flower I used Marianne Designs Flower Set LR0145
and for the leaves Flowers and Leaves LR0156.

I CASEd Cathleen's card, ctorina on Splitcoast Stampers, but I changed up the labels and DP. I cut a rectangle and rounded the edges then used Spellbinders Labels 4 and 14 all edges with a gold leaf pen. The flower is made with Marianne Designs LR0145, the leaves from the LR0156 set and the flourish is from the Decorative Elegance set LR 0157.

I used Spellbinders Labels 14 and 18 and one of the Spellbinders Fancy Tags 3 dies cut and embossed with the Cuttlebug and edged with a gold leaf pen. For the flower I used Marianne Designs Flower Set LR0145
and for the leaves Flowers and Leaves LR0156.

I CASEd Cathleen's card, ctorina on Splitcoast Stampers, but I changed up the labels and DP. I cut a rectangle and rounded the edges then used Spellbinders Labels 4 and 14 all edges with a gold leaf pen. The flower is made with Marianne Designs LR0145, the leaves from the LR0156 set and the flourish is from the Decorative Elegance set LR 0157.
Wednesday, July 27, 2011
Verity

For this card I used another lovely digi stamp from Sugar Nellie, her name is Verity. I colored the image with Prismacolor pencils and Turpenoid and cut her out with a circle Nestie and adhered her to a pleated circle made with the same Martha Stewart edge punch I used for the strip behind it. The flourish was made with the first Marinanne Designs Createables die I ever bought, LR0116.
Tuesday, July 26, 2011
Createables
I have been absent again but not unproductive. I have been working on cards for Dutch Paper Crafts that I am unable to share with you yet. I can however share these cards and you can go to Darlene's blog HERE to order the Marianne Designs Createables that I used. As usual Darlene has the dies at a discounted price that you won't find anywhere else and her shipping charge is just what it costs her. Tell her Jennie sent you!


For this card I used LR0162 for the flowers and leaves.

The flower and leaves for this card is from the LR0164 set.

The set I used for the flower and leave for this card is LRO163.
Thursday, July 14, 2011
Faith
I have been getting a guilty conscience lately because I haven't been doing much coloring. Somehow it seems like cheating to me when all I do is run cardstock and a die through the Cuttlebug.I used dies and a punch for this card but I also did some coloring!

This lovely image is a digi from Sugar Nellie. Her name is Faith. You can buy her HERE I also used a Martha Stewart Daisy Punch Around the Page and a Marianne Designs Createables die. Faith is colored with Prismacolor pencils and Turpenoid.

This lovely image is a digi from Sugar Nellie. Her name is Faith. You can buy her HERE I also used a Martha Stewart Daisy Punch Around the Page and a Marianne Designs Createables die. Faith is colored with Prismacolor pencils and Turpenoid.
Friday, July 8, 2011
Swirls
I appreciate your comments very much but if you comment as 'Anonymous' I don't know who you are and cannot reply if you have a question. I had 'Anonymous" ask yesterday how I did the corner within the frame. There is a tutorial on my blog HERE
Punches and the Cuttlebug got a workout for this card! It was made for a challenge on my Yahoo group Card Camp. The challenge was to use a punch, a die cut and an embossing folder.

I used two different Martha Stewart punches, Swirling Lace and Scallop 3 Dot both Punch Around the Page. The embossing folder I used is Cuttlebug Textile Textures and the dies are a Marianne Createables set Designer Doily LR0130. I sponged all the edges with Peach Pastel Colorbox Fluid Chalk. Each layer is raised with dimensional tape.
Punches and the Cuttlebug got a workout for this card! It was made for a challenge on my Yahoo group Card Camp. The challenge was to use a punch, a die cut and an embossing folder.

I used two different Martha Stewart punches, Swirling Lace and Scallop 3 Dot both Punch Around the Page. The embossing folder I used is Cuttlebug Textile Textures and the dies are a Marianne Createables set Designer Doily LR0130. I sponged all the edges with Peach Pastel Colorbox Fluid Chalk. Each layer is raised with dimensional tape.
Subscribe to:
Posts (Atom)