Thursday, October 29, 2009

Thinking of you today


While blog hopping this morning I was inspired by a card on this blog I started by using a Martha Stewart border punch on the edge of the card base front and added a panel of blue paper to the card base. The blue paper on the side of the card is adhered to the inside of the card. The same border punch was used on the front panel. The sentiment is a part of a Michael's $1 stamp and the image is from a sheet by Nikki.

Monday, October 26, 2009

Tunnel card challenge

The challenge for this week on the Crafty Card Creators group is to make a tunnel card. This is the card I made.

This is the front of the card. The image is part of a stamp from Whipper Snapper colored with Prismacolor pencils and OMS.


This is the inside of the card, It is actually a paler shade of lavender than the outside but looks kinda white in the picture. The flowers are from a set from Rubbernecker Stamps and the sentiment is from Impression Obsession.

Sunday, October 25, 2009

Holiday Heart


Another Christmas card today. I am slowly getting holiday cards done. This stamp is Holiday Heart by Rubber Stampede. It is colored with Prismacolor pencils and OMS. I cut four small panels, stamped them with a Petite Backgrounds stamp from Stampin Up using Versamark ink and then inked the edges and the edges of the heart with brown. Simple but the coloring took some time!

Saturday, October 24, 2009

Lighthouse

This is a card I made back in August for someone who loves lighthouses.


Friday, October 23, 2009

Graphics to share

I don't have a card that I can share yet. I have been working on cards for the weekly challenge on craftcardcreators.

There seems to be a lot of sickness going around so I thought I would share a couple of graphics I made in Paint Shop Pro that you can snag and send to someone who is under the weather.


Click on the image to bring up the full size graphic and save to your computer.

Thursday, October 22, 2009

Snow Angel

This card is for a sketch challenge swap.


I just love this little angel! It is an old stamp from Stampendous but when I saw the series I had to get all that I could find. I think I have them all except one. I used a Cuttlebug die to cut the tag and the sentiment is from Papertrey Ink.

Wednesday, October 21, 2009

Little Snowman

I will not be here the first part of November and then there is Thanksgiving and as I signed up for November swaps I needed to get them done early.


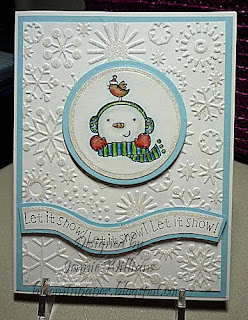
I used the snowflakes Cuttlebug folder and added glitter for the background. The snowman is from Hampton Art and the sentiment is an un-mounted stamp from 'My Sentiments Exactly'

Tuesday, October 20, 2009

A Christmas Rose x 2


The frame on the white layer is dry embossed using a part of the same stencil as I used on THIS card. I then use the light box to trace the image lightly in pencil. It is colored with Prismacolor pencils and OMS and outlined with a gold gel pen. I traced one flower again, colored and outlined it and cut it out and attached it with a pop dot. I used the gold gel pen to highlight some of the embossing.


For the second card I used the same image but larger. I traced the image using a mapping pen and white acrylic ink onto cardstock weight vellum. The leaves are colored on the back side and the berries on the front side. The berries were then embossed using a ball stylus on the back. The flowers were done with a stylus (When you rub something hard on vellum it turns white) I colored the centers of the flowers with yellow and then pricked the center from the back side.

Monday, October 19, 2009

Glitter Dove

It is time to get serious about making holiday cards!

This was a pretty quick and easy card to make. I used a white card base and a white panel. I used a square Nestabilities die to cut and emboss an aperture in the white panel and backed it with a piece of pearl blue CS. For the dove I used the embossing folder from a folder/ die cut set from Cuttlebug. It was cut with a Nestie square and then I used a glue pen over the embossed edge and dove and sprinkled with glitter. The dove layer is popped up with dimensional tape.

Saturday, October 17, 2009

Snowy Greetings

It is hard to even think snow when you live in South Texas. It has been over 24 years since we saw snow! I do still like to make cards with snow though as it reminds me of my childhood in England waking up every morning on the days approaching the holidays and looking out of the window to see if it had snowed during the night so that we would have a White Christmas.


I love these jolly little snowmen from Great Impressions. The blue snowflake paper I have had in my stash for a while .... probably from Hobby Lobby. The white layer is a scrap embossed with the Cuttlebug snowflake folder.

Wednesday, October 14, 2009

Embossing and Pearls


Lots of embossing on this card! The embossing template I used is the Star Collection Dish by Marianne Designs. You can find it HERE I followed the directions on the packaging for the embossing on the white part and then use a part of the stencil to do the embossing on the pink layer. The 3d sheet is from Nikki and I added pearls in two sizes.

Tuesday, October 13, 2009

Another Pansy Birthday

This card is for another friend who has a birthday in November.


For the corners I used a part of a Luxe Label stencil and cut it out with a swivel blade knife. The salutation is a peel off sticker and the 3d sheet is from Nikki.

Monday, October 12, 2009

Pansies in a bowl


I made this card for a friend's birthday. It is very similar to cards I have made before but I think she will like it. I really do need to get some more border punches. I am getting tired of using the same three all the time!

Sunday, October 11, 2009

Enjoy the ride

This is a simple card I made for my daughter to give to a 72 year old man who will be riding with her in the Tour De Tuscon, a 109 mile in one day ride for charity.


I used a Cuttlebug Distressed Stripes folder for the green panel and then rubbed over it with a white ink pad. I did the salutation on the computer and then stamped the cactus as a symbol for Arizona.

Saturday, October 10, 2009

Hey Friend

This is another card I made for a swap.


For the background I stamped the image from a retired set by Stampin Up multiple times using chalk ink. The stamp has a frame around the image so I made sure to only ink the center. The sentiment stamp is also from a retired set by Stampin Up. It doesn't show up too well in the picture but the ribbon has a blue edge. I got my color scheme from the ribbon which is so pretty.

Thursday, October 8, 2009

Magnificent Fall Colors


Doing something in fall colors doesn't come easy to me as oranges and browns are my least favorite colors. When I joined this swap in a 3d group I belong to I had to find a 3d sheet that was fall-like but not too orangy. This sheet is from Nikki and I loved the leaves hanging with clothespins.

Although it doesn't show well in the picture I stamped the green layer with a leaf stamp and Old Paper Distress ink and inked the edges with brown chalk ink. Before cutting out the images I used the same distress ink and a texture cube from Stampendous to stamp the images, the white layer and the card base and I also inked the edges with the brown chalk ink. I hope the recipient likes it!

Tuesday, October 6, 2009

Hydrangeas in a basket

I opened my scanner to scan something and found this card that I had put in there to scan and then I guess I got distracted and forgot about it! Hydrangeas


The scrapbook paper matched the colors of the flowers perfectly so I knew which paper I wanted to use. I embossed the paper with the tiny bubbles Cuttlebug folder. The 3d sheet is from Nikki.

Monday, October 5, 2009

One layer card

This is a card I made for a weekly challenge, one of the fun things there are to participate in at Crafty Card Creators, my favorite Yahoo Group.


I used a Martha Stewart border punch on the bottom edge and Scor-Pal to emboss the lines above and below the salutation from Stampin Up. The flower is from a clear sheet from Michaels. I made a mask of the flower and cut it out. Then I stamped the first flower with Versamark ink, covered it with the mask and stamped a flower on each side overlapping the mask slightly. I removed the mask, stamped the salutation with Versamark ink and then used Ranger Super Fine Detail embossing powder. The flowers are colored with pencils and OMS.

If you would like to join a fun Yahoo group you can join Crafty Card Creators HERE We would love to have you join us.

Sunday, October 4, 2009

10 Cards All Done!


Here are the 10 cards I made using the digi stamps I posted yesterday. I have a start on Christmas!

Saturday, October 3, 2009

10 Christmas Cards


Back in June I showed you how to make 10 cards from one 8-1/2" x 11" sheet of decorator paper. I got to thinking that this would be a great way to make Christmas cards too! I have made some Christmas digi stamps for you that will fit the dimensions for the image square of the cards. You can find the directions for making the 10 cards and the digi stamps HERE
I have not made a set of Christmas cards yet but I will post pictures when I have them done. Enjoy!

Friday, October 2, 2009

Boughs of Holly

Halloween is one of the holidays I don't do and I usually don't send Thanksgiving cards so I have started on Christmas. When I send Christmas cards I need them not to require extra postage, except the ones for family and special friends, as it can get pretty expensive. I do like to send handmade cards so I don't do a lot of layers. As long as a card is a standard size, doesn't weigh more than 1 oz and is less than 1/4" thick It will only require a 44¢ stamp.

TIP: If you have a cutter with a sliding blade the gap where the blade slides is 1/4" so if your card will fit through the space you will be a-okay on thickness.

For this card I stamped the holly branch and the salutation on white CS then used a rectangle Nestie to trace a rectangle making sure that some of the leaves overlapped the rectangle. I colored the image with Prismacolor pencils and OMS and then used a ruler and craft knife to cut the straight lines stopping just shy of the overlapping parts. I then cut around the overlapping leaves with scissors leaving a small white border. I adhered this to a slightly larger red mate with dimensional tape. For added texture on the green mat I scored lines using Scor-Pal.