Saturday, December 31, 2011

Happy New Year

These are the last samples of 2011 that I made for Darlene at Dutch Paper Crafts. The dies are for sale on her blog.


Wednesday, December 28, 2011

Favorites of 2011

December has not been a good month for me as far as blogging goes but I hope 2012 gets off to a better start than 2011 ended! In the meantime I thought that I would finish off this year by showing you my favorite cards from each month in 2011.


January

February

March

April
 
May
 
June

July

August


September

October

 November 

 December

Wednesday, December 21, 2011

Gift card holder

I haven't had time to make any cards lately but I did make some gift card holders for a fundraiser a couple of weeks ago.


This is an easy card to make and a great way to use up some of those scraps! The gift card envelope is closed with a tiny magnetic snap. The Congrats on the first three cards is from a Cuttlebug die that I have had forever. I don't think it is available anymore but you might have it in your stash!

 This will be my last post until after the holiday so to all of you.


HAPPY HOLIDAYS!

Monday, December 19, 2011

A Christmas card....and more

I still do not have my desktop back thus the shortage of blogs. In the meantime I have added a new member to my family.....a puppy!


Nutmeg is 4 months old and was adopted from the Humane Society.The pictures were taken with an i-phone at the Humane Society facility and Nutmeg was not being very cooperative!


I mailed most of my Christmas cards before I remembered that I hadn't taken pictures! This is one card I still have. The image was a free digi from Gina K. I colored some images with different colors but my favorite was this one.

Sunday, December 11, 2011

I'm back...kinda

My desktop is still not fixed but I did download my photo editing program to my laptop so I am sort of in business again.
These are some cards I made for Dutch Paper Crafts using Marianne Designs ornament dies.


I also used a pop-up die to make this card.


For this easel card I used a small calendar to hold the card open.


For this book card the ornaments are cut from holographic paper and backed with pearl paper. The ornaments in the box are suspended on clear thread. I fixed the thread to the back of the ornaments with Scor-tape and poked small holes in the top and bottom of the box and threaded the thread through and fixed it with Scor- tape. As you move the card the ornaments jiggle and catch the light.

For the bell ornament I decided to make a wedding card instead of a Christmas card

Monday, December 5, 2011

Missing

I didn't realize that it has been so long since I updated my blog! My desktop computer where all my files and programs are is sick with a virus and the guy who fixes it has also been sick so I only have my laptop. I have lots to share but am unable to at the moment.

Tuesday, November 15, 2011

Tag gift card

I have been trying to come up with different ways to include a gift card in a Christmas card but not having it be obvious. This is what I came up with.


This is the card closed with a belly band around it. The DP is from a My Paper Studio pad called Ornamental Christmas. (I think that is Hobby Lobby's own brand) The image is a digital image from Mo Manning colored with Prismacolor pencils.


 This is the inside of the card with a tag in a pocket.


For the gift card I attached it to the back of the tag with a piece of temporary double sided tape. After I finished the tag though I thought that I could have made it a couple of inches longer, scored it and bent to the back to hold the gift card.I will try that on the next one. This one is a little plain because it is for a man.

This card is 5" x 5" when folded up with the belly band but you can make it any height you want. For the basic card you need a piece of cardstock 11" x the height you want your card to be. On the long side score at 2.50", 4", 7"and 8.50" I cut my DP 1/8" smaller than the panels. For the tag holder you need to cut it 3" wide and then trim off a little so that the sides will fold over the middle.

Monday, November 14, 2011

Crafts Too embossing folders

These are samples I made for Dutch Paper Crafts using embossing folders from Crafts Too which you can order HERE

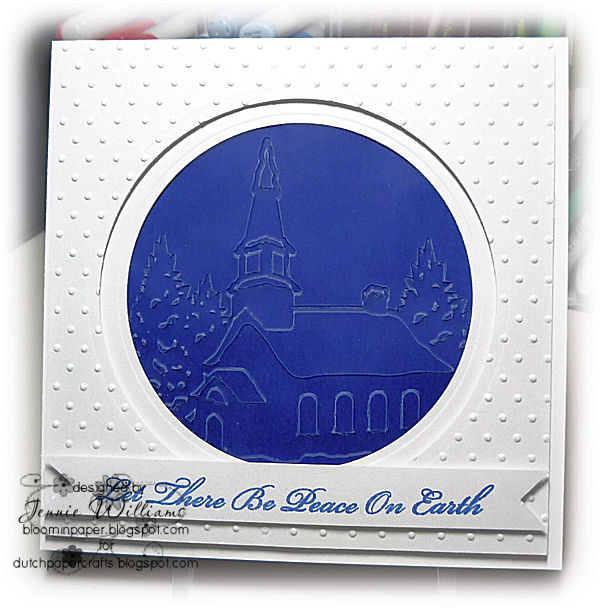
 This is the Winter Village folder embossed on blue vellum.


This is the Christmas background folder using the de-bossed side.


For the Christmas Wreath I added glitter to some parts of the wreath.


This folder is called Pine Tree Scene.


For the Snowflake Banner folder I embossed on white core card stock and then did some sanding.

This is the Sleigh folder. The border is a Martha Stewart snowflake border punch and the sentiment is from Papertrey Ink Signature Christmas clear stamp set.


This is the pretty Snowflake Banner folder.


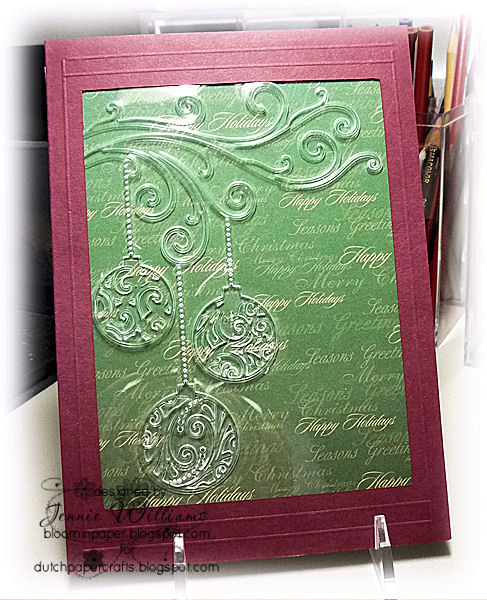
I think this Swirl Baubles folder might be my favorite. I embossed on clear cardstock which like vellum makes the embossing white. 


For the Swirl Christmas Tree I embossed on cream cardstock and highlighted the dots in the swirls with a gold leaf pen and then added a gold peel off.

If you order any of these folders from Darlene tell her I sent you!

Sunday, November 13, 2011

3D decoupage

I have a ton of 3d decoupage sheets. I order them from a lady in England and so I tend to order a lot at a time. The image I used on this card is from the only Christmas sheets I have.


For the border I used punches from Martha Stewart Punch Around the Page. Behind the 3d image I used the same Spellbinder die from the Ironwork Motif set that I used as a snowflake on previous cards.

Saturday, November 12, 2011

Back to Christmas

I used the same Cuttlebug embossing folder, one of a set of five called Winter Wonderland,  as I used on the star cards for this card. Again I used an image that I had previously colored a darling image from Mo's Digital Pencil. I cut it out with scissors and attached it to the card with dimensional tape.

Friday, November 11, 2011

Dahlia

I found this image already colored in the pile on the side of my table and decided that I needed to make a card with it before it got lost forever!.


I used a Spellbinder label 13, traced around the inside of the dies and then cut it out with scissors. I then used the same die and the Cuttlebug to cut a mat from red cardstock. Behind the label is a Marianne Designs Creatables LRO 116.

Wednesday, November 9, 2011

More stars

I used the same embossing folder for this card but this time I used three different sizes of stars. The sentiment is from the same PTI set, Signature Christmas.

Tuesday, November 8, 2011

Ornament cards

I saw this card on a blog, Inspiration Blooms. I had the Cuttlebug embossing folder but I did not have the stamp that she used so I  had to compromise.

 I used a stamp of a Christmas tree from Flourished and stamped it three times with Versamark ink and embossed with gold embossing powder and then used a Nestie to cut the stars. The sentiment is from PTI also embossed in gold.

 I did the same thing for this card but I used a medallion stamp that is a little bigger than the star.