Monday, August 23, 2010

Beautiful roses

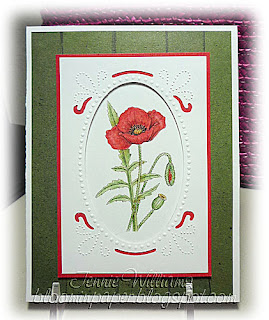
When I found this beautiful rose image I knew I had to make a card with it. The image is from Jak Heath and you can see the beautiful wedding card she made and download the image HERE


I printed the image 4 times and for the base layer I used an oval Nestie and traced around the inside between the image then cut it out around the oval and the overlapping parts of the image. I then used the same Nestie to cut the underneath panel. I cut the other 3 images apart to make a 3D image.

Thursday, August 19, 2010

Delivery Boy Santa

This is the third and last digi stamp I bought from Sassy Cheryl.

 The image is colored with pencils and OMS, DP is from DCWV The Christmas Stack. The greeting is another from the bulk buy of unmounted stamps I bought on eBay from Hampton Arts. I stamped the greeting and then cut out around it, glued it to the background color cardstock and cut around it again before mounting it with dimensional tape.

Wednesday, August 18, 2010

One Flake At A Time

This is the second digi image that I got from Sassy Cheryl. It is called Twiggy the Snowman.


The DP is from DCWV, the image was colored with pencils and OMS. The sentiment is from a bulk buy of 100 unmounted stamps from Hampton Arts that I found on eBay.

Monday, August 16, 2010

Wind-up Santa

I keep my most used edge punches out where I can see them but I have a lot in a drawer that I forget about. This Martha Stewart snowflake punch is one that my daughter bought on clearance and we had both forgotten about it.

The cute stamp is a digi from Sassy Cheryl called Wind-up Santa colored with pencil and OMS....no I haven't broken down and used my Copics yet! Sassy Cheryl had a special offer, buy two get one free so I bought three Christmas digi stamps. I will be working with the other two today. Maybe they will make me forget the 100 degree temperature we are expecting today!

Friday, August 13, 2010

Poppy Dots

I don't know about you but I have a lot of strips of paper and cardstock that I didn't know what to do with. Heaven forbid I throw them away! While sitting pondering with a stack of strips in front of me I happened to look up and see all my border punches. I had a great time making pretty strips!

I found this image already colored and mounted on a black panel..... I don't remember what I was going to do with it originally......and the green card base was sitting on my table so I put them together to come up with this card. Now to make some more cards with the strips I made.

Tuesday, August 10, 2010

Pretty In Peach

Wow I didn't realize that it has been 3 days since I posted! Well I didn't stay away from the stencils very long.This is the card I made yesterday. 

There is a lot of cutting on this card. I really should consider that before I start! I used Anja Style corner 2 FE 6124 stencil and repeated it on the four corners. The 3d sheet is from my stash and the pearls are half pearls colored with a Copic marker. I really must start using my Copics to do something other than color pearls! Maybe today?

Saturday, August 7, 2010

Elegant Ellipse

As promised this is a card made with the Cuttlebug Elegant Ellipse emboss and cut folder. This one didn't make a nice clean cuts either. Hmmm, maybe it is me and not the folder? The folders have two magnetic plates held together with some kind of softer plastic than the embossing folders which gives them a little play. I have just been putting the CS on the bottom plate and flipping the lid closed. I  tried again being a little more diligent with making sure the sides met perfectly and it worked much better so it was me!

I cut an oval a little larger than the hole in the red layer for the image to show through. The image layer is glued to the background paper and the embossed panel is raised with dimensional tape.

I messed up the center medallion from the card above but the card below is made with the center medallion from another one I cut in cream. I used  chalk to highlight the embossing, a Martha Stewart edge punch on the DP and the Swiss Dots Cuttlebug folder on the card base..

Friday, August 6, 2010

Daisy, Daisy

I received my order of Cuttlebug folders and a couple of the new emboss and cut folders so I just had to try the emboss and cut. I must say that I am disappointed as they do not give a nice clean cut. I had to do a little trimming of the little hairy bits that were left behind. 


The first one I tried is the Chic Circle Frame. In the middle there is a medallion that is cut out leaving a hole. I will use the medallion on another card. For this card I used different shades of cream. The daisies are from my 3D sheet stash. I colored some half pearls with a Copic marker and added a bow. I will share a card made with the Elegant Ellipse folder tomorrow.

Thursday, August 5, 2010

A rose is a rose

I think that I have done enough embossing for a while. These cards take a lot of time!


For this card I used the last of the four new stencils I just bought. This one is Mattie stencil EH 1837 that I got from The Art Of Craft Ref: 4.051.43
After doing the embossing and cutting I cut small pieces of DP to put behind some of the cut-outs.and glued the panel to a darker pink panel. Luckily I had a corner rounder that was exactly the size I needed to round the corners. The 3D sheet that the roses came from is from my stash. The sentiment is from an older set from Stampin Up.

Wednesday, August 4, 2010

Blue flowers

Please forgive my obvious lack of imagination.  I really have a hard time knowing what title to use for my posts!

 I went with soft colors for this card. The 3D flower sheet that I wanted to use is very soft and feminine so that is the direction I went. I used a part of a border stencil EH 1825 for the stenciling and then cut a circle out of the middle with a Nestie.I then cut a size smaller circle from a piece of blue CS and glued it behind the opening. After cutting a blue panel a little larger than the white panel I cut a white circle larger than the opening and glued it to the center of the blue panel. I laid the white panel on top of the blue panel temporarily and glued down the first piece of the 3D image on the white circle. The white panel was then adhered to the blue panel with dimensional tape and I continued to add the layers of flowers using silicone glue. Before gluing the top panels to the card base I embossed a border around the front of the card base using the Martha Stewart score board. A lot of work but I love the result!

Tuesday, August 3, 2010

Rose and Butterflies


I used another one of the new stencils I bought for this card. While cleaning up my desk I found this corner rose digi image from Fred She Said that I had already colored and cut out so I decided to use it. The stencil is a Mattie stencil EH 1840 which I only found at Art Of Craft  Ref: 4.051.440
The sentiment is a $1 stamp from Michael's and the butterflies are a Martha Stewart punch. I punched out the butterflies, shaded them, colored the bodies and added the antennae. In two corners are green jewels.

Monday, August 2, 2010

Blossom

This is another card I made using a stencil I haven't used before. It is not one of the stencils I just bought but one I put away and forgot about.
The biggest problem I have with these stencils is that they are metric and therefore do not fit well on our standard sized cards. This card is 5.75" square, not a size that easily fits in a standard sized envelope.


 This template is from the Star Collection PD 0002 which is just an embossing stencil that has a few different templates on the same stencil. I measured the length and width of the template I wanted to use to determine the size I needed to cut the white panel. After that it was easy just to line up the stencil with the edge of the paper. What wasn't so easy was that this stencil wasn't made with cutouts! After doing all the stenciling I had to cut out between the lines with no pencil lines to guide me. It took a loooong time and is by no means perfect but I love the way it looks.
The blossom image is a digi I found on the net, sorry I don't remember where. The small flowers are a punch. All the flowers have a tiny black jewel in the center but they only show when you look at the card at an angle!

Sunday, August 1, 2010

Lilies

The mailman delivered the new stencils I ordered from Art of Craft in England. I ordered them on Monday and they were in my mailbox on Thursday! The best thing though is that they cost me $37.50 including shipping but if I had ordered them from Kamya they would have cost me $56.93. I love stretching my crafting budget! I do order from Kamya or A Touch Of Grace when Art of Craft doesn't have the stencils I want.


For this card I used one of the new stencils, Mattie open passe-partout EM 1827 and a 3D sheet from my stash.